Thursday, May 26, 2011

Proton Inspira CPS Supercharged

This is my latest project, Proton Inspira CPS Supercharged. Inspired by Satria Neo supercharged R3 Engine, I decided to put it into the Inspira body.

Car enthuasist might be dissapointed by the drop of CC from 1.8/2.0 to 1.6 but a turbocharged engine is more interesting than naturally aspirated (N/A) engine. Despite an engine that is made by national car maker Proton, this engine is supposed to match the power of at least 1.8 N/A engine, with fuel economy as 1.6 engine. 

The car is modeled in 3ds Max 2010 and rendered using mental ray.  Enjoy the pics.


Any comments please drop it so I can improve. Thanks!

Saturday, May 07, 2011

Combining 3D object with real photograph V2

With some comment from my sister, i re-edit my last piece to make it more realistic.. hope it does.. how do you think?

Wednesday, May 04, 2011

Combining 3D object with real photograph

Hi.. Its almost 5 month since my last post, showing how lazy I am to update this blog. I'm now focusing on 2D animation, but I never abandon 3D. Most of the time I use 3D to create object that is hard to draw, and then I render it using ink n paint.
But now I try to test something new to me. I'm trying to combine 3D object with real photograph. Its a tough job, and for this project I use my last 3D model, the old proton saga. Once I learn the trick, I try to apply on other render as well, and hopefully post it here.

Below is my test, I took a picture infront of my house, as the Background plate.
Then I render the model using mental ray matte/shadow/reflection shader.

Monday, November 08, 2010

Satria Neo Replacement Personal Impression

Hi.. its been long time since I post here..
I'm now focusing on 2D artwork right now since I'm doing a 2D animation. If you have interest in 2D animation come and visit my blog http://archangel-project.blogspot.com and my deviantArt bahtera-http://merdeka.deviantart.com

So back to todays post. Malaysian car enthuasist are in hype for latest proton model saga Facelift and Inspira. My parents meanwhile already bought the original saga blm so there is no way we gonna change to the new facelifted saga. Inspira? still long way to go. While saga and Inspira spyshots has already emerged on the net, we might missed out our Satria Neo.. Is there any plan for Neo replacement? Just this year proton updated the neo with Lotus Racing tuning for their 25th anniversary . However its very limited..

After long thinking, I decided that I want to make my personal impression for Satria Neo replacement.
This artwork has a very deep influence on current Neo, wih a little bit touch of Honda City face. I felt that this still doesnt look futuristic enough.. Now i know designing car its not an easy task afterall..

Enjoy the pics. Click to enlarged.

Sunday, September 26, 2010

Setting that I use for Ambient occlusion and Ink n paint

Hi,
Even though no one ask me for this, I hope i can help someone who want to achieve the same ink n paint + AO render as mine.

Below is the setting I use for the AO (click to enlarge) :


Below is the setting I use for 'Ink n Paint' material :

Tips for mental ray users : If you want to assign all object to the same material, use 'material override' in Mental ray render setup -> Processing -> material override and drag to the button.

Hope that helps! thanks for your visit

Friday, September 24, 2010

Proton Saga 3D modeling in 2D Rendering


Salam and hi everyone.

This is actually a continuation of earlier project, the saga first edition. At first the model are rendered out as ink and paint render, which is similar to lineart drawing. Then I render out ambient occlusion (AO) pass seperately.

Using wacom tablet, I painted in the color in photoshop. Then i combined the ink n paint pass together with AO pass on top of the color layer. both layer were set to Multiply in blend mode, with additional opacity reduction for the AO pass.

The background for the car was created earlier before the car project started. It is actually a small workshop scenery, which I find it suitable to show off the car engine. haha.

thank you for your visit~
p/s : To keep my blog a lil bit fresh, I changed to newer template. Its much easier to the eyes now haha.

p/s 2 : more about Ambient Occlusion can be read here : http://3dsmaxrendering.blogspot.com/2008/04/ambient-occlusion-pass-for-interior.html


Tuesday, September 21, 2010

New Project - Proton Saga First Edition


Greetings everyone.

While everyone getting hyped  by the new proton Lancer thats just around the corner, why no we sat back and enjoy the first product of proton, the Proton Saga First Edition. Hahaha.

If you love 3d model render, you will notice that many times you can only see the car exterior body. So I try to be unique here,  I try to focus on the engine bay of the car. 
The car is powered by 4 piston, 8 valve 1.3cc engine by mitsubishi. The engine is extremely reliable and have a very low cost of maintenance. The fuel system is powered by old school Aisan Twin Barrel Twin Butterfly Carburettor.


Aisan Twin Barrel Twin Butterfly Carburettor

I render the models on 2 passes, one using Ink and Paint material, and another using Ambient Occlusion Pass.

Thats all for the entry. Thanks for your visit.

Failed Project explained...

Hi,
Regarding my last project, the proton Exora MPV, there is a problem which lead to the halt of the project. It is about all its glass windows, including the front windshield.


From the picture above, you can see that the window is not smooth. It looks like a piece of soft plastic or wrapping paper..

After trying to fix the problem several times, it seems that the problem lies in my modeling technique, where I modeled the chassis and window seperately, as pictured above.

The problem requires a major modification on the polygons, thus I decided to put this model onto halt.

I however managed to prove my theory on my next 3D models. Below is the new model :
I model the chassis together with the windows and windshield. The polygons of the windows were only detached after the modeling of the required parts is complete. For example, I modeled the door altogether with the windows in 1 piece. Once I complete the door, I then select the polygon which makes the windows, then press the 'detach' button, to seperate the window from the door.

Although I didnt manage to complete the model, I've learn a valuable lesson. Hopefully I'll be able to do better models soon.

Monday, July 26, 2010

Work in Progress 5

Salam and Hello,
I still working with the modeling project.

It seems the project took a long time to complete, probably caused by my skill that has rotten too much. haha.
Hope it can be completed by the end of this week.
I believe you can guess already what car it is.

Thursday, July 22, 2010

Work in Progress 4

Back bumper.

Wednesday, July 21, 2010

Work in Progress 3

Door and back fender

Monday, July 19, 2010

Work in Progress 2

Aslmkm and Hello,

I still working on my little project. This project will not only focus on the modeling but more to my research towards Photorealism 3D.

Its still in progress, but instead of leaving the blog hanging, I decided to post some progress.


Yes I know its just one part (the bonnet) since last update. Hope I can do more part sooner enough.

Monday, July 12, 2010

Work in Progress

Working on new modeling project.

Guess what car is this?

Sunday, July 11, 2010

UVW map modifier.

Okay, as promised, here is the UVW map tutorial. This is a very basic technique to texturing, and its a prelude to my next tutorial, Unwrap UVW mapping.

UVW is a coordinate system for textures. it is almost similar to XYZ system, with U represent X axis of the 2D surface (your 3D model surface), V represent Y axis. You might ask why 2D plane have a Z axis (depth)? This is for the system to recognize normal or flipped texture. It is used mostly on procedural map and it does not effect your normal bitmap texture.

So why you need to apply the UVW map modifier. If you are applying your texture to your 3D model by simply dragging it to the model and hoping it will come right, you might face problem later when one time you have complex model to texture. Model that is build using line and extrude modifier will also face this problem most of the time.

If you use the coordinate rollout inside the diffuse bitmap material box, he Tiling and Offset thingy to coordinate your texture on the model, you also might face problem later if you want to use the same material on other polygons.

So, here the UVW map come to the rescue.

UVW map allow you to set the coordinate/position of your model texture individually. Let say you have a 3D house model. You want to use brick texture. At first on the front of the house you may want to have a different look, by tilting the brick at 70 degree, with the size of brick that is suitable for it. However, at the other parts such as the pillar, you want the brick to have bigger brick size and aligned horizontally. This is possible by using UVW map modifier separately for each object (wall and pillar).

Below is  the basic method on how to use UVW map on a simple box.
First, create a simple box.


Open material browser, click the diffuse map, the pop-up list, choose bitmap.

Choose any texture that you like, in this tutorial I use a brick texture.

Click the show standard map in viewport. Drag the brick slot onto the material.

Select the box, and on the modify panel, modifier, choose UVW map
There are several options on the parameter rollout after you apply the UVW mapping to the box.


For this lessons, we choose Box mapping, and on the Alignment sub-section below, choose Fit. It will automaticly adjust the map gizmo to fit the selected object. You can try to experiment the Alignment XYZ radio button and see the results.

To adjust, use the U/V tile shown in picture below.  adjust to your liking.


click the UVW Mapping modifier on the modifier stack. The word Gizmo will be shown. click the gizmo word.

You can adjust the gizmo box by using move and rotate tool.


Thats all for the tutorial. On the next tutorial I will share with you on how to use UVW unwrap.

Friday, July 09, 2010

My 3D artwork done on training

Hi, sorry for late update..

Its not that I'm sitting idle though. I have a very litte free time during last 2 month due to the internship. It's almost come to an end which is next wednesday. I'm here to share some of my work done during the internship. About the UVW map? oh below is an example too where I use the modifier..

Okay2 I'll post the tutorial hopefully by this saturday okay.

Sunday, May 16, 2010

Mental Ray 3.8

It's been a long time since I post here.. haha.
Anyway here's a link about mental ray 3.8 which will be implemented in 3ds Max 2011. 


http://features.cgsociety.org/story_custom.php?story_id=5655

Although I didnt update this blog for almost 2 months, doesn't mean that I sit idle okay...
In my training, I was asked to do a matte painting background for a green screen footage.
Quite interesting to know that many - many movies are using this technique and you can watch yourself where they are implemented. Below is the link :

 http://www.kalibervfx.com/KaliberVFX/FF4_Demo.html
 http://www.kalibervfx.com/KaliberVFX/KVFX_Demo.html

Btw.. I would like to make a UVW map tutorial on the next post so until next time.. see ya!

Tuesday, February 02, 2010

Internet Problem

First of all, I would like to apologize for lack of update for almost a month.

This is due to internet problem from my service provider Celcom broadband. the connection is so bad that i can only surf for 10 to 15 minutes before "Page not found" error pops up. So each day 10-15 mins all I can do is check my email.. huh..

Now I connect using EDGE instead of 3G, so I can surf longer, although loading time takes its toll.
Its RM99 per month with this type of service... I dont know how crappier our internet will becomenear future. I already applied Streamyx but its already 3 weeks, their service still doesnt come to my home..

Tuesday, December 15, 2009

Tutorial - How to create artificial reflection on object using 3Ds Max

Hello everyone,

I've been asked about how to do artificial reflection on objects by Fridz-max last month, but only now I've able to spend some time to do the tutorial. Sorry for waiting.

Artificial reflection on 3D object involves the use of HDRI, High Dynamic Range Images, that use approximately seven high resolution images of the same scene at different exposure. Well luckily we dont have to do that as there is plenty of HDRI images readily available on the net, and some of them are absolutely free. Try google 'HDR free download' .
Instead of normal JPEG or BMP, the extension will be .HDR. Here are one of my HDR resource.
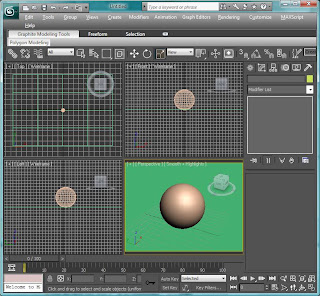
Click here>> Smash-method-HDR 3<<. In this tutorial I prepared a simple scene which has a 'sphere' as the subject and a big 'plane' surface as the ground. Then I add daylight system like one on the previous tutorial.
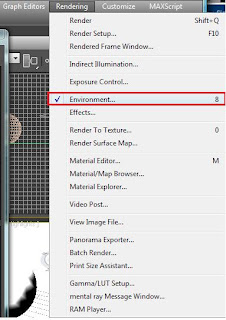
Next, go to Rendering menu, and choose Environment.

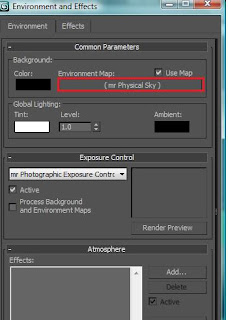
On the Environment and Effects window, on Background rollout, click the button shown below.


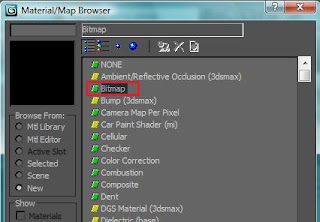
Material/Map Browser window will pop-up. From the list below choose Bitmap.
Next, choose on the Files type tab, choose 'Radiance Image File (HDRI)'. Navigate thru the folder which you store the HDR files that you have downloaded. Make sure you extracted the files if its in ZIP or RAR files using Winrar or Winzip.

Once you have chosen the desired image, click Open. Another window will pop-up. Click the settings according to the picture below.
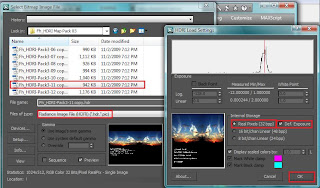


Next, on 3Ds Max buttons, click the Material button shown below.

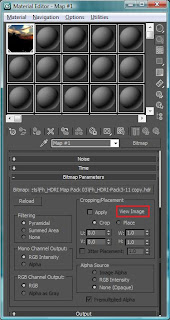
Material Editor Window will pop-up. Move the window beside the Environment and Effects so that both of the window are cleary seen. Then, drag the 'Map' button to any available Material slots.
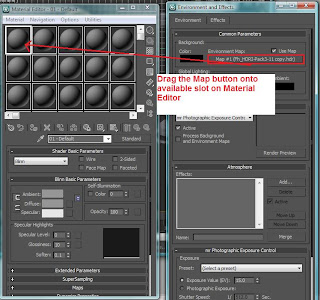


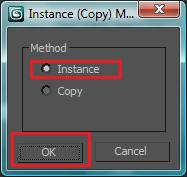
You will be asked wheter to Instanced the material or to Copy. Choose Instanced.
Then, on the material editor window, under Coordinates rollout, change the Mapping from Screen to Cylinderical.
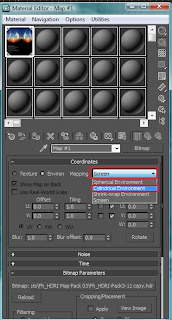
Then, scroll down until you found the Bitmap Parameter rollout. Click the View Image button.

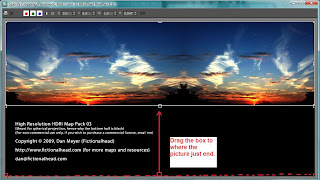
A window of the HDR picture will show up. If you download the HDR pack from the link that I give, you will notice a credits of the author on the bottom of the picture. This will show up on the reflection later, so we need to crop out the text, leaving only the desired picture. On the bottom center of the picture you will notice a small box that can be dragged. Click-hold the box, and drag it upward until just where the picture ends. See picture below.
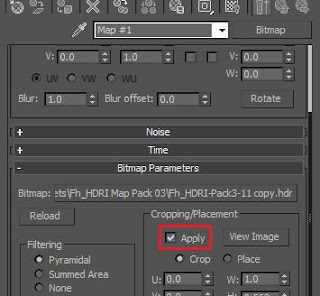
Once done, close the picture window. Tick the 'Apply' checkbox shown below


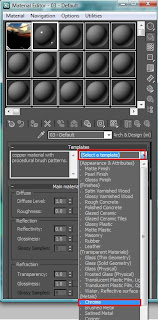
We have finish setting up the environment. In order to test it we need to apply a highly reflective material to the subject. Click on any empty slot, and change the standard material to 'Arch and Design', shown on the picture below.
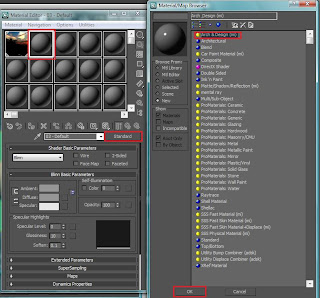
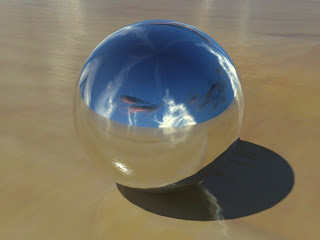
Then, click on the 'Select a template' drop down menu, and choose Chrome. Apply the material to the sphere. For the ground plane, use 'Arch and Design' - 'Glossy Varnished wood'


Below is the result of this tutorial. You can try to experiment different type of material to see how it reflects the HDR images.


I hope you enjoy the tutorial.

p/s : I'm still a beginner in 3D world so some terms and words that I used may not be accurate.