(Click the picture to see full size)
1) On the create panel, choose system. Then click Daylight to create a daylight system.

2) A dialog box will appear. Choose Yes

3) On Top viewport, click at anyplace to create the daylight system. I recommend you put the daylight system far from the object you created so that the icon doesnt mess up wih your object. The method of creation is : First you create a compass. Then another click you will be setting the height of the sun system. You dont have to worry about the exact height because Max will take care of this later when we set the parameter.

4) On the control parameter rollout on the right of your screen, click 'Get Location'

5) Choose geographic location for your scene setup. I choose Asia - Kuala Lumpur, Malaysia. Click OK.

6) Then on the same rollout, set the time you desired.
 7)Go to modify panel and on the Daylight Parameter rollout change the Sunlight system to 'mr Sun' and Skylight system to 'mr Sky'.
8) A dialog box will pop-up when you choose mr Sky. Choose Yes.

9) You need to set the renderer to Mental Ray for this thing to work. On Render setup, on the 'Assign Renderer' rollout, for production choose mental ray renderer.

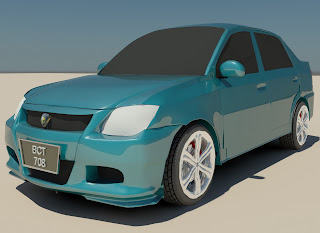
Both of the render below is the result of the lighting setup above.

Thank you. Comments in English and Malay are welcome
Wah3...I got it.finally.thanks bro..allow me to paste your link in my column.hehe
ReplyDeleteParameter ape yang perlu di adjust utk render camni?sbb saya try2 color dia lari sikit.macam xsparkling..
bro Fridz,
ReplyDeletekenapa kebanyakan render yg bro buat background dia gelap? mungkin itu antara sebabnya. yela.. macamana nak material tu nak reflect cahaya kalau persekitaran dia gelap kan.. Background kat render saya semua auto generate dari 'mr Sky'.
Apa material yang bro pakai? itupun antara sebab juga.
Sorry, Lambat reply. Sibuk pulak sejak dua menjak ni.
ReplyDeleteSaya pakai material raytrace..utk plastik appearance kdg saya tambah bump sket.tu pun kalu nk detail btul2.
Maksud saya begini. Kalu pakai daylight system, color key material saya jadi cerah sedikit. jadi kadang tu xdpt color yang saya nk.
tapi teknik daylight ni saya suka.kene byk explore lagi laa nmpaknya.
Saya tgh rework model sedia ada ni. Jadi xde artwork baru laa.hehe.
Ingat nak refine semula Savvy IRC saya tu..
bro fridz,
ReplyDeletepasal color jadi lain sikit tu saya pun jadi mcm tu jugak.. tapi saya x kisah sgt.
Tapi katakan la macam semua color dalam scene tu berubah, langit, body, lantai cermin suma tak sama, bro fridz cuba tengok dekat menu rendering -> environment.
Dekat rollout 'Exposure Control', pilih 'mr Photographic exposure control', lepas tu click render preview. scroll bawah sikit ada dia punya rollout, bro select preset yang ada.
Dia ada Daylight indoor, outdoor, night. sambil bro tukar bro click lagi render preview. tgk perubahan. Bro juga boleh main2 dgn saturation apa2 je dekat bwh tu dan sentiasa render preview utk dapatkan hasil terbaik.
Pasal material pula, saya cadangkan bro guna 'Car paint material'. Pastikan bro dah tukar renderer kepada 'mental ray' baru boleh kita pilih material tu.
Apa2 yang bro fridz nak tau, bro boleh tanya saya, saya boleh jadikan tutorial dalam blog saya ni hehe.