Saturday, November 07, 2009

Distributed Rendering using mental Ray


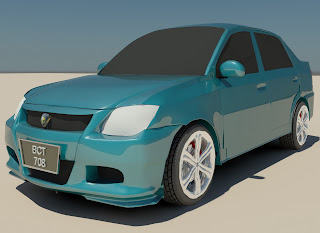
3D rendering using combined 1 quadcore computer and 1 dualcore computer.
Quadcore : AMD Athlon II X4 620 2.6Ghz @ 2.9Ghz OC - 2GB RAM
Dualcore : Intel Core 2 Duo E8300 2.83Ghz - 1GB RAM
3D Software : 3Ds Max 2010
Renderer : Mental Ray 3.7

Thursday, November 05, 2009

Tutorial - How to create realistic Lighting in 3Ds Max

Someone has asked me how I do the lighting setup for my 3D car render, so here it is.
(Click the picture to see full size)

1) On the create panel, choose system. Then click Daylight to create a daylight system.


2) A dialog box will appear. Choose Yes


3) On Top viewport, click at anyplace to create the daylight system. I recommend you put the daylight system far from the object you created so that the icon doesnt mess up wih your object. The method of creation is : First you create a compass. Then another click you will be setting the height of the sun system. You dont have to worry about the exact height because Max will take care of this later when we set the parameter.


4) On the control parameter rollout on the right of your screen, click 'Get Location'


5) Choose geographic location for your scene setup. I choose Asia - Kuala Lumpur, Malaysia. Click OK.

6) Then on the same rollout, set the time you desired.

7)Go to modify panel and on the Daylight Parameter rollout change the Sunlight system to 'mr Sun' and Skylight system to 'mr Sky'.

8) A dialog box will pop-up when you choose mr Sky. Choose Yes.

9) You need to set the renderer to Mental Ray for this thing to work. On Render setup, on the 'Assign Renderer' rollout, for production choose mental ray renderer.


Both of the render below is the result of the lighting setup above.


Thank you. Comments in English and Malay are welcome

Progress report 3

I dont have much time to update this, but here are some progress :

Successfully modelled Proton Gen-2 car.In the past I find it very difficult to learn any 3D Modeling tutorial, but just recently I feel very easy to do it. I just refering to old tutorial taht I have gone thru before and this is the result.

All are modeled myself exluding the tyre and rim. I download it at turboquid.com

Overwhelm with 3D, I decided to model another car. This is New Proton Saga (codename BLM). The tyre is the only thing that I imported. other are modeled myself.


Thursday, September 03, 2009

Progress Report 2

Well. its almost 10 days since last report..

Below is a screenshot of Andrian (the main character) car modeled in 3ds Max 2010 which I done last week. Although it look ok but there is major problem to this model so I need to discard this and make another one.


Work in progress


Rendered model. Notice the flaw.. the model is not smooth due to the usage of non-polygon faces.

Thats all for this post.

Monday, August 24, 2009

Progress Report 1

Hello to all readers,

Before this I decided to post only major updates, but my slow progress makes quite a long delay between the report. So hopefully if nothing goes wrong, I'll report any progress that I make even the smallest one so there will be at least a single update every day.

Okay for the update.

I found it to be very difficult to animate continuously. I mean, lets say I'm animating the character to walk, then soon after the walk, the character are going to sit. While there is no problem to animate the first task (which is the walk cycle), when continuing to different acts/ movement, I found it very difficult to do the transition between one act to the other.

Japanese Animation, aka Anime often have side products than the animation itself such as Artbooks, Soundtracks, Figure (dolls) and other merchandise. While searching in google about 'Code Geass', one of my favourite anime, I found a few scans from their Artbooks.


Each of the character are presented in many ways, probably to assist those animators. This maybe the reason for my difficulties. I need a good reference of my character so that I can animate better.

So I try to do a basic reference of my character first. Below are turn around reference for Nana and Andrian.


Nana Turn-Around Reference


Andrian Turn-Around Reference


I also done a color reference for Andrian


Well.. after I done this, I notice that my drawings speed improve, although there still a long way to go..

Wednesday, August 19, 2009

Early Development Phase

The development of the project began on the semester 2 2008/2009, when I'm taking Project 1 subject. At that time the main focus are the storyline,storyboards, few research and thesis paperworks.
As the semester is packed with heavy subject, no real progress are made. As the semester ends and new special semester starts (semester 3), I began to start drawing the animation. Due to lack of skills and knowledge to animate, all my 4-5 weeks of works end up failure. The animation is sluggish, not smooth, blinking and inconsistency of drawing occurs everywhere.
Thus I research further and come up with this book,


Animation survival kit by Richard William.

The book is packed with lots of stuff for animators from beginner to advance. The book is not only for 2D animators but for 3D as well. It covers from the concepts of Timing and Spacings, Arcs, Anticipations, Weights with lots of examples. For those who wants to be an animator I highly recommend this book to you.

As the special semester near its end, I finally getting a graps of the technique to animate properly, although is still far from perfect.


Some problems encontered :

- Background is too static
- Which parts to animate first, Hierarchical order
- Lack of guidance from professionals, rely heavily on books.
- Slow drawing, unable to focus on drawing too long due to eye strain (caused by CRT monitor flicker).
- Drawing inconsistency, lots of repairing = slow.

Any development will be reported on the next post as frequent as possible.

Sunday, August 16, 2009

Ten Hundred Project

Greetings to all readers of this blog.

What is Ten Hundred?

Ten Hundred is the name of an animation movie that I intend to create for my Final Year Project of my Bachelor in Graphics and Multimedia in University of Tenaga Nasional, Putrajaya Malaysia.


Details :

Ten Hundred is a 2D Animation assisted with 3D Computer Graphic Images (CGI) which is developed to study effective method of developing 2D Animation similar to Japanese style known as Anime. Ten Hundred will be about 30 minutes long animation focusing on an event that takes place in UNITEN itself.


The method :

This animation will be developed using fully digital method. Artwork will be done using graphic tablet digitizer, with Adobe Photoshop as the main platform. Adobe After Effects will be used for animating and composition.

Each animated scene will then be compiled in Adobe Premiere, while music scores and sound effects will be added in the final stage. Incorporating patriotism together with entertainment will be the main focus of this animation.


The purpose of this blog :

This blog will be used to report the current progress of the project as frequent as possible. This is to propel the progression of the project while at the same time increase self awareness and self discipline towards the goal of completing the project.


That's all for this posts. This blog is successfully created on 16 August 2009 on Sunday 10:20PM at my house at Klang Perdana, Kapar.