
Wednesday, July 21, 2010

Monday, July 19, 2010
Work in Progress 2
Aslmkm and Hello,
I still working on my little project. This project will not only focus on the modeling but more to my research towards Photorealism 3D.
Its still in progress, but instead of leaving the blog hanging, I decided to post some progress.

Yes I know its just one part (the bonnet) since last update. Hope I can do more part sooner enough.
I still working on my little project. This project will not only focus on the modeling but more to my research towards Photorealism 3D.
Its still in progress, but instead of leaving the blog hanging, I decided to post some progress.

Yes I know its just one part (the bonnet) since last update. Hope I can do more part sooner enough.
Monday, July 12, 2010

Sunday, July 11, 2010
UVW map modifier.
Okay, as promised, here is the UVW map tutorial. This is a very basic technique to texturing, and its a prelude to my next tutorial, Unwrap UVW mapping.
UVW is a coordinate system for textures. it is almost similar to XYZ system, with U represent X axis of the 2D surface (your 3D model surface), V represent Y axis. You might ask why 2D plane have a Z axis (depth)? This is for the system to recognize normal or flipped texture. It is used mostly on procedural map and it does not effect your normal bitmap texture.
So why you need to apply the UVW map modifier. If you are applying your texture to your 3D model by simply dragging it to the model and hoping it will come right, you might face problem later when one time you have complex model to texture. Model that is build using line and extrude modifier will also face this problem most of the time.
If you use the coordinate rollout inside the diffuse bitmap material box, he Tiling and Offset thingy to coordinate your texture on the model, you also might face problem later if you want to use the same material on other polygons.
So, here the UVW map come to the rescue.
UVW map allow you to set the coordinate/position of your model texture individually. Let say you have a 3D house model. You want to use brick texture. At first on the front of the house you may want to have a different look, by tilting the brick at 70 degree, with the size of brick that is suitable for it. However, at the other parts such as the pillar, you want the brick to have bigger brick size and aligned horizontally. This is possible by using UVW map modifier separately for each object (wall and pillar).
Below is the basic method on how to use UVW map on a simple box.
First, create a simple box.

Open material browser, click the diffuse map, the pop-up list, choose bitmap.
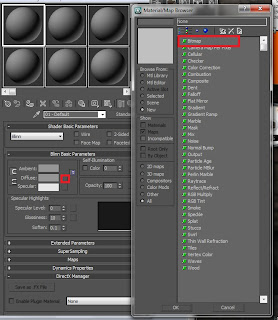
Choose any texture that you like, in this tutorial I use a brick texture.

Click the show standard map in viewport. Drag the brick slot onto the material.

Select the box, and on the modify panel, modifier, choose UVW map
 There are several options on the parameter rollout after you apply the UVW mapping to the box.

For this lessons, we choose Box mapping, and on the Alignment sub-section below, choose Fit. It will automaticly adjust the map gizmo to fit the selected object. You can try to experiment the Alignment XYZ radio button and see the results.

To adjust, use the U/V tile shown in picture below. adjust to your liking.

click the UVW Mapping modifier on the modifier stack. The word Gizmo will be shown. click the gizmo word.

You can adjust the gizmo box by using move and rotate tool.

Thats all for the tutorial. On the next tutorial I will share with you on how to use UVW unwrap.
UVW is a coordinate system for textures. it is almost similar to XYZ system, with U represent X axis of the 2D surface (your 3D model surface), V represent Y axis. You might ask why 2D plane have a Z axis (depth)? This is for the system to recognize normal or flipped texture. It is used mostly on procedural map and it does not effect your normal bitmap texture.
So why you need to apply the UVW map modifier. If you are applying your texture to your 3D model by simply dragging it to the model and hoping it will come right, you might face problem later when one time you have complex model to texture. Model that is build using line and extrude modifier will also face this problem most of the time.
If you use the coordinate rollout inside the diffuse bitmap material box, he Tiling and Offset thingy to coordinate your texture on the model, you also might face problem later if you want to use the same material on other polygons.
So, here the UVW map come to the rescue.
UVW map allow you to set the coordinate/position of your model texture individually. Let say you have a 3D house model. You want to use brick texture. At first on the front of the house you may want to have a different look, by tilting the brick at 70 degree, with the size of brick that is suitable for it. However, at the other parts such as the pillar, you want the brick to have bigger brick size and aligned horizontally. This is possible by using UVW map modifier separately for each object (wall and pillar).
Below is the basic method on how to use UVW map on a simple box.
First, create a simple box.

Open material browser, click the diffuse map, the pop-up list, choose bitmap.

Choose any texture that you like, in this tutorial I use a brick texture.

Click the show standard map in viewport. Drag the brick slot onto the material.

Select the box, and on the modify panel, modifier, choose UVW map


For this lessons, we choose Box mapping, and on the Alignment sub-section below, choose Fit. It will automaticly adjust the map gizmo to fit the selected object. You can try to experiment the Alignment XYZ radio button and see the results.

To adjust, use the U/V tile shown in picture below. adjust to your liking.

click the UVW Mapping modifier on the modifier stack. The word Gizmo will be shown. click the gizmo word.

You can adjust the gizmo box by using move and rotate tool.

Thats all for the tutorial. On the next tutorial I will share with you on how to use UVW unwrap.
Friday, July 09, 2010
My 3D artwork done on training
Hi, sorry for late update..
Its not that I'm sitting idle though. I have a very litte free time during last 2 month due to the internship. It's almost come to an end which is next wednesday. I'm here to share some of my work done during the internship. About the UVW map? oh below is an example too where I use the modifier..


 Okay2 I'll post the tutorial hopefully by this saturday okay.
Its not that I'm sitting idle though. I have a very litte free time during last 2 month due to the internship. It's almost come to an end which is next wednesday. I'm here to share some of my work done during the internship. About the UVW map? oh below is an example too where I use the modifier..


Sunday, May 16, 2010
Mental Ray 3.8
It's been a long time since I post here.. haha.
Anyway here's a link about mental ray 3.8 which will be implemented in 3ds Max 2011.
http://features.cgsociety.org/story_custom.php?story_id=5655
 Although I didnt update this blog for almost 2 months, doesn't mean that I sit idle okay...
In my training, I was asked to do a matte painting background for a green screen footage.
Quite interesting to know that many - many movies are using this technique and you can watch yourself where they are implemented. Below is the link :
http://www.kalibervfx.com/KaliberVFX/FF4_Demo.html
http://www.kalibervfx.com/KaliberVFX/KVFX_Demo.html
Btw.. I would like to make a UVW map tutorial on the next post so until next time.. see ya!
Anyway here's a link about mental ray 3.8 which will be implemented in 3ds Max 2011.
http://features.cgsociety.org/story_custom.php?story_id=5655

In my training, I was asked to do a matte painting background for a green screen footage.
Quite interesting to know that many - many movies are using this technique and you can watch yourself where they are implemented. Below is the link :
http://www.kalibervfx.com/KaliberVFX/FF4_Demo.html
http://www.kalibervfx.com/KaliberVFX/KVFX_Demo.html
Btw.. I would like to make a UVW map tutorial on the next post so until next time.. see ya!
Tuesday, February 02, 2010
Internet Problem
First of all, I would like to apologize for lack of update for almost a month.
This is due to internet problem from my service provider Celcom broadband. the connection is so bad that i can only surf for 10 to 15 minutes before "Page not found" error pops up. So each day 10-15 mins all I can do is check my email.. huh..
Now I connect using EDGE instead of 3G, so I can surf longer, although loading time takes its toll.
Its RM99 per month with this type of service... I dont know how crappier our internet will becomenear future. I already applied Streamyx but its already 3 weeks, their service still doesnt come to my home..
This is due to internet problem from my service provider Celcom broadband. the connection is so bad that i can only surf for 10 to 15 minutes before "Page not found" error pops up. So each day 10-15 mins all I can do is check my email.. huh..
Now I connect using EDGE instead of 3G, so I can surf longer, although loading time takes its toll.
Its RM99 per month with this type of service... I dont know how crappier our internet will becomenear future. I already applied Streamyx but its already 3 weeks, their service still doesnt come to my home..
Subscribe to:
Posts (Atom)